Tips before before you start:
- If you’re not familiar with stringing BJDs or BJDs in general, I highly recommend to read these instructions first before starting!
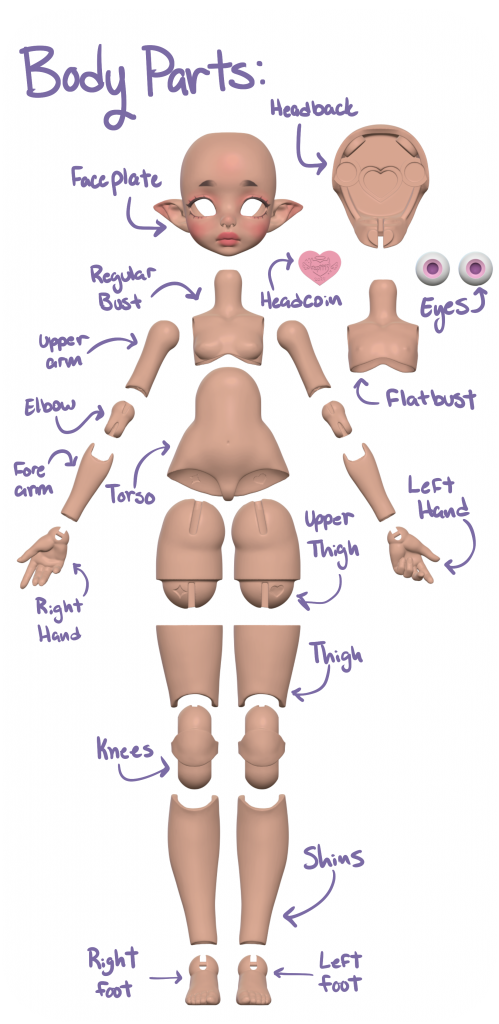
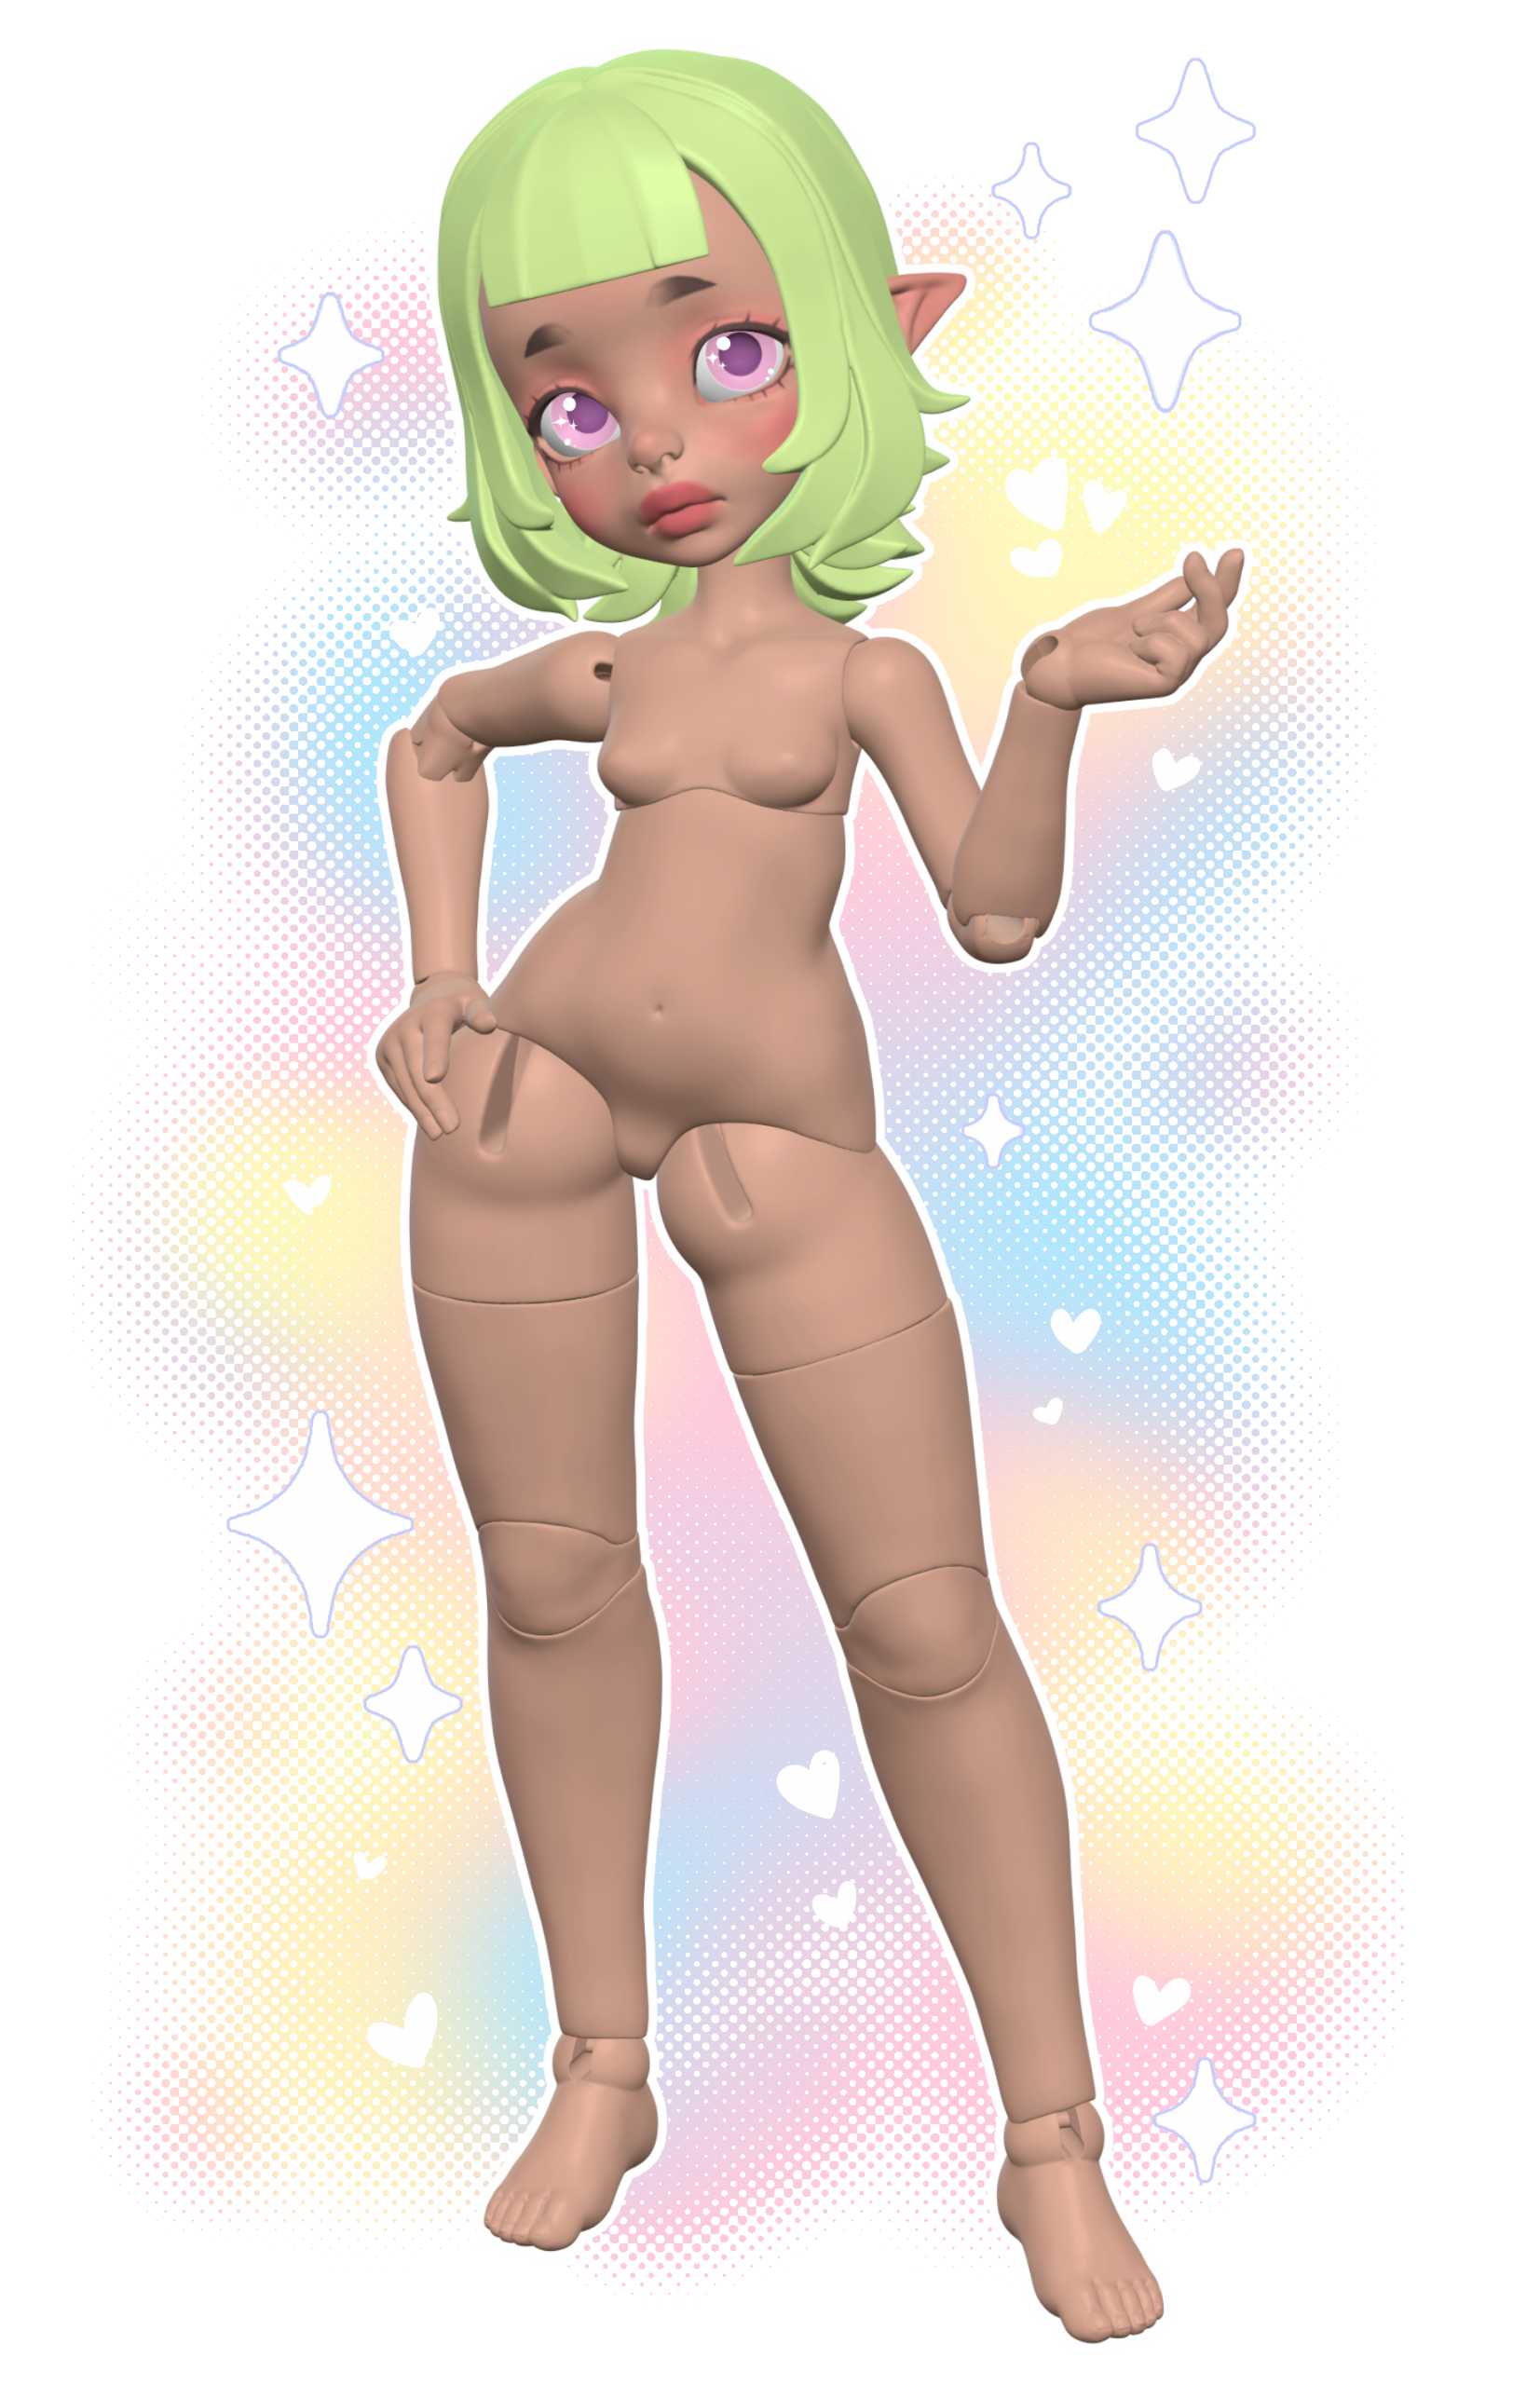
- In addition if you’re new to stringing a bjd, I recommend laying out your pieces in order just like the body parts picture to map out your pieces.
- Use the sparkle and heart symbols (as shown on the upper thigh piece) on the body parts to know where parts go!
- Sanding may be necessary to remove 3D print supports on some parts and be sure to do this before starting assembly!
- When sanding, be sure to sand in a well ventilated area!
In your kit, you will have:
- Your unassembled Doll
- 0.8mm Jewelry Elastic
- 3D Printed Eyes
- O-ring
- Eye putty
- Magnets (4x 5x3mm for the head back and faceplate, 2x 5x2mm for horns/ears magnets)
- 100/180 Nail File (to remove the supports)
- 180/240 Grit Sanding Sponge (to smooth where supports were sanded)
What you will need:
- Super Glue
- Scissors
Optional supplies:
- Exacto Blade (to trim supports)
- Rotary Drill (Dremel, Pen sander, electric nail dill, etc for sanding)
- Nipper Cutter (Specifically the kind used on Gundam kits!)
Let’s Begin!
Step 1:
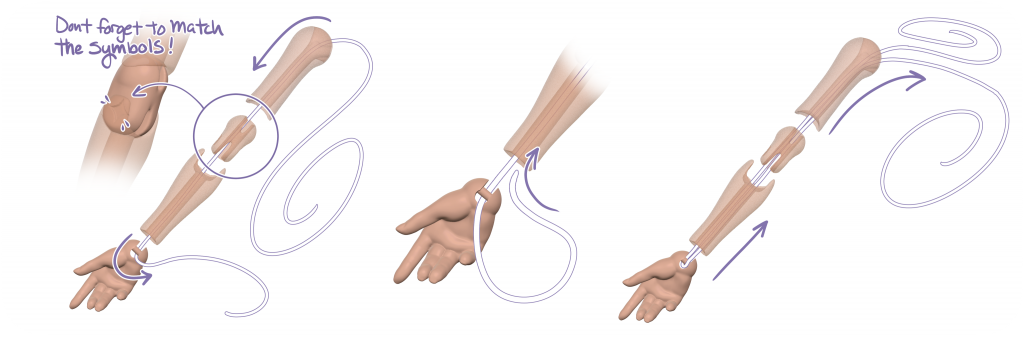
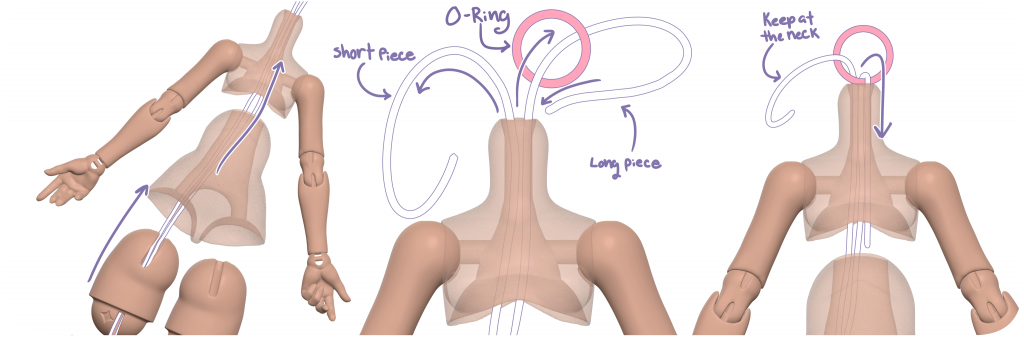
♡ Start with one set of the arms and string your elastic starting from the upper arm, through the elbow joint, then the forearm, and then hands at the wrist joint, be sure have the pieces match the same symbols. (Think of this like you’re stringing beads on a bracelet or a necklace!) Loop the elastic through the wrist joint and to back through the forearm, elbow, and upper arm back where you started while keeping the arm loosely strung.
Step 2:
♡ Choose the chest of your choice and insert your elastic in the arm joint on one side of the chest. While inside the chest, pull the elastic so that you have a shorter piece of elastic (I recommend at least 3-4in for the arms) that will go outside through the bottom of the chest and a longer piece to go through the other side of the chest to repeat step 1 for the other arm pieces.

Step 3:
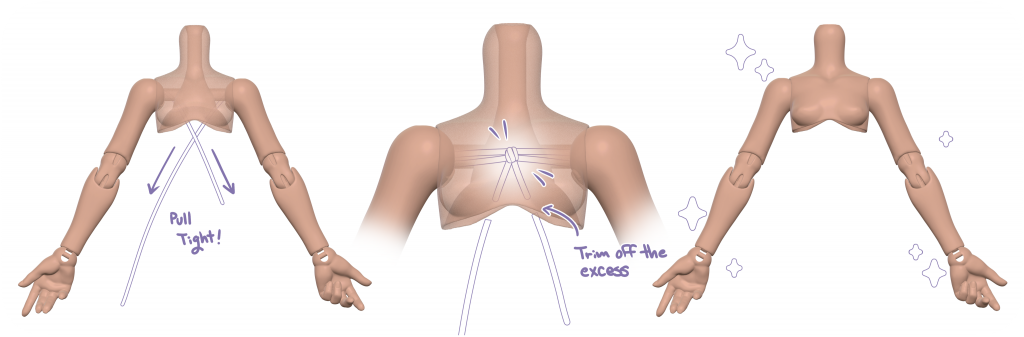
♡ Once both arms are strung, pull the elastic tightly to make the necessary tension in the arms (if the arms are too floppy and don’t stay when posed, it’s not tight enough!). Then tightly tie the elastic 4-5 times to secure it inside the chest, trimming the excess, make to leave a little allowance, around half a centimeter, to prevent it untying itself. And just like that, the arms are finished!
Step 4:
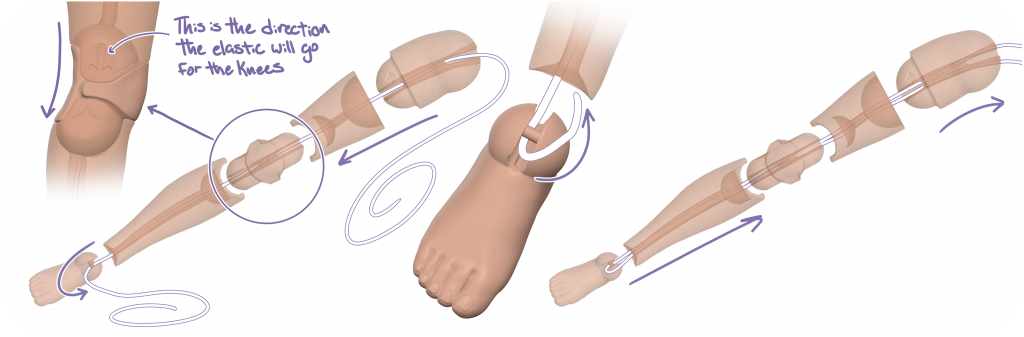
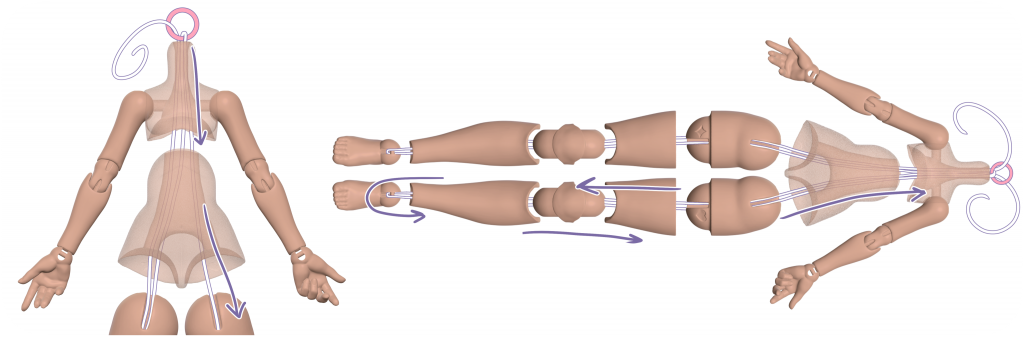
♡ Repeat the process as the arms with the leg pieces. String your elastic starting with the upper thigh, thighs, then the knees, shins, and feet feeding the elastic at the ankle joint before going back in reverse order from the shins to the upper thigh piece, keeping the leg loosely strung.
Step 5:
♡ String both pieces of the elastic from the strung leg into leg joint of the torso, continuing through the chest piece through the top of the neck. Just like the arms, pull the elastic so that you will have the short piece of elastic that will stay at the neck and a longer piece that you string through the O-ring and back through the chest (make sure the longer piece is very long, it will be for the other leg!).
Step 6:
♡ This part may be tricky, but feed the longer piece of elastic through the chest and torso to string the other leg just like step 5. Then feed the elastic back into the torso, up through the chest, and back up to the neck. (Optional: if this is too difficult, you can repeat step 4 and 5 with the other leg. Just tie off the elastic on the o-ring as below shown in step 7 before starting the other leg)
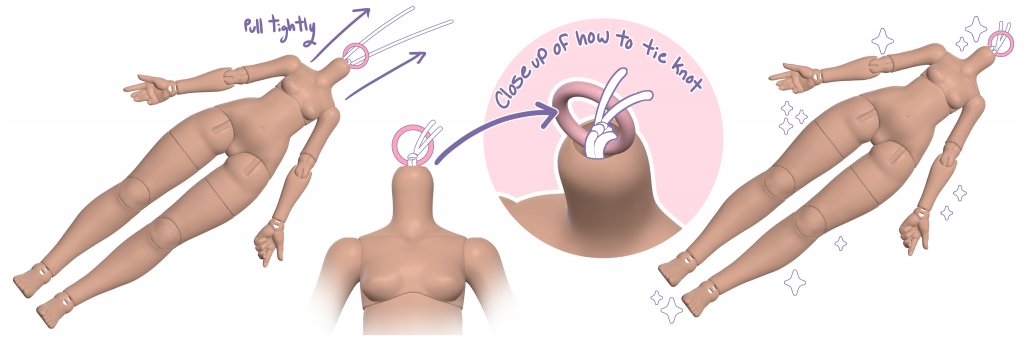
Step 7:
♡ String the elastic back through the O-ring before tightly pulling to create the necessary tension for the legs (Just like the arms, if they legs are too floppy and don’t stay when posed, they’re not tight enough! This may take a bit of adjusting to make sure the legs have equal tension). Tightly tie the two ends of the elastic a 4-5 times and trim excess elastic. And now the whole body is done!
Step 8:
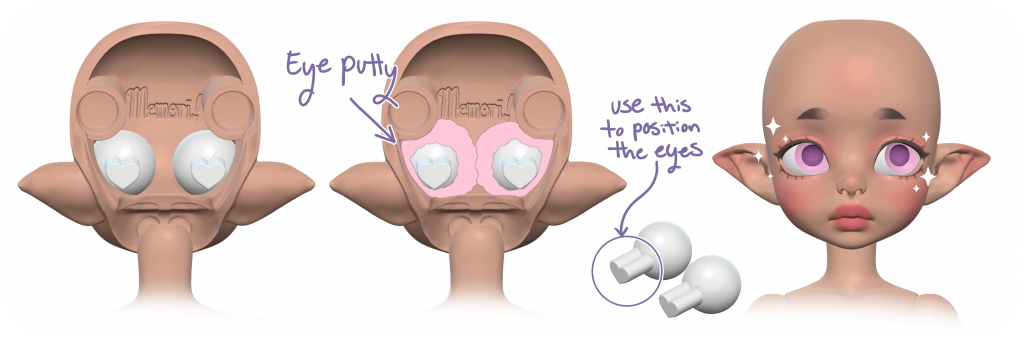
♡ Install the headcoin and magnets in the headback and magnets in the faceplate with glue (Be careful installing magnets so they don’t repel each other, also let each pair of magnets dry before going to the next!) If you don’t want to glue the magnets, you can use the eye putty to hold the faceplate and headback together, use a small amount in the places as shown below.
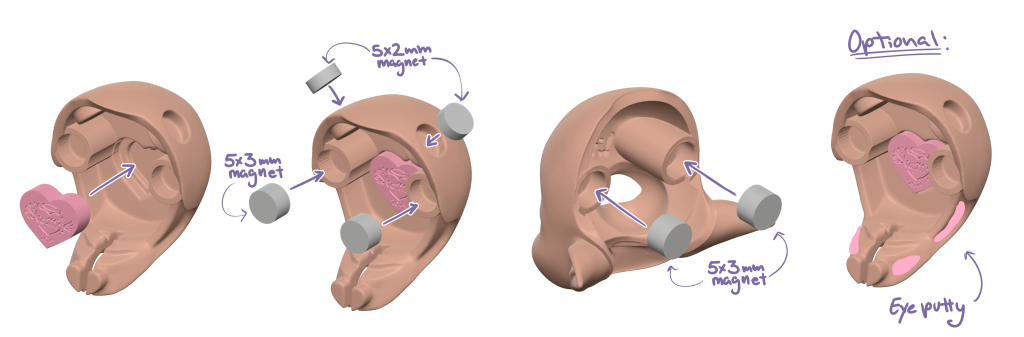
Step 9:
♡ To install the eyes, place the eyes inside the faceplate and use the putty to secure them. Use the sticks from the eyes to position them in the desired direction.
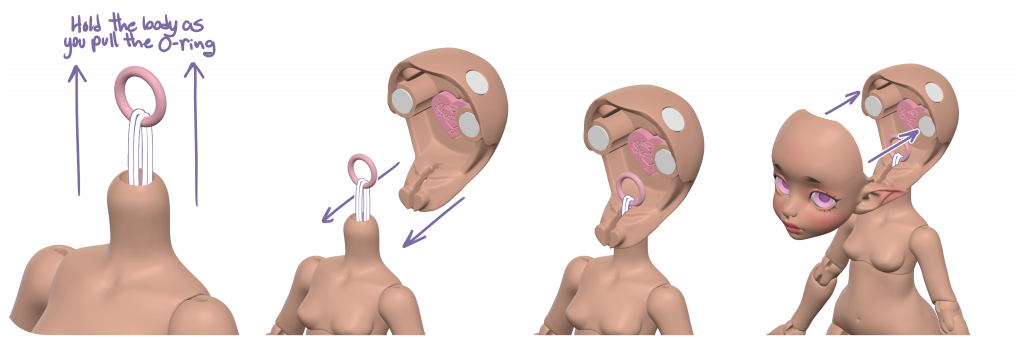
Step 10:
♡ To install the head back, pull up the O-ring up from the body and slide in the headback on the body, then attach the faceplate to the body.
Once done, your doll is now fully complete and ready for adventures!
Additional Tips!
♡ If you are sanding any parts, sand in circular motions for uniform sanding. I also recommend to use a rotary drill with a sanding bit, pen sander, or electric nail drill to clean up the printing supports!
♡ For painting your garage kit, use supplies that are safe for resin such as acrylic paints, watercolor pencils, and chalk pastels. And don’t forget to use proper sealants like Mr Hobby Super Clear Matt before and after painting (Be sure to spray outside and wear a proper respirator!)
♡ If you want to buy eyes for your doll, they wear 8mm eyes!
♡ These dolls wear 1/12 clothing! Examples of what they can wear include Pico Neemo P, Puki Puki, and (some) Blind box dolls of the same scale! Shoes are currently still untested at the moment…
♡ While these dolls are printed in high quality durable resin, they are still resin so treat your doll with care and avoid long periods in the sun!
♡ Due to the surface of 3D prints not having much friction, I recommend sanding where the ball joints and sockets are or inserting wire in the arms and legs to help with posing (Make sure its not too thick to go inside the doll parts!)
If you’d like to see more information about my dolls, go to the button below to learn more!
Want to give feedback?
This page is a work in progress and will be edited as time goes! If you feel like something is missing in this tutorial or a part of the tutorial isn’t clear, don’t be afraid to send feedback to suggest changes for the future!